The next
step in building a kegerator is buying the parts
to the kit you will need for assembly. If you are
using a refrigerator you will want to get a kegerator
kit that includes a shank and handle faucet rather
than a tower faucet. Tower faucets are for converting
freezers such as chest freezers into kegerators.
Here you
will learn what parts you will need and discover some
advice of experience to get you one step closer to
building your own kegerator conversion kit.
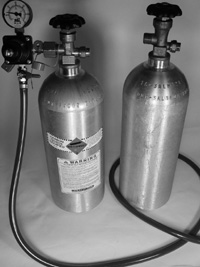 1.
CO2 Tank. For at home use these tanks usually
come in 2.5 pound or 5 pound sizes however get much
bigger for commercial applications. The size refers
to how much the cylinder weighs when empty and put
on a scale. 5 lb tanks are preferred and usually
last around 7 or 8 kegs depending on the P.S.I the
brewer recommends and if you have an leaks or not.
Obviously, you fill these with CO2 and that can
be done at any welding supply shop for around $11
dollars. BE CAREFUL some welding supply shops will
prefer the aluminum tanks and will 'swap it out'
instead of refilling yours - this leaves you with
a dirty, funky tank. Tell the welder shop to 'refill
only' please. And if they won't accommodate you find a new shop.
1.
CO2 Tank. For at home use these tanks usually
come in 2.5 pound or 5 pound sizes however get much
bigger for commercial applications. The size refers
to how much the cylinder weighs when empty and put
on a scale. 5 lb tanks are preferred and usually
last around 7 or 8 kegs depending on the P.S.I the
brewer recommends and if you have an leaks or not.
Obviously, you fill these with CO2 and that can
be done at any welding supply shop for around $11
dollars. BE CAREFUL some welding supply shops will
prefer the aluminum tanks and will 'swap it out'
instead of refilling yours - this leaves you with
a dirty, funky tank. Tell the welder shop to 'refill
only' please. And if they won't accommodate you find a new shop.
Tip:
Buy an aluminum tank. They don't rust and maintain
a cleaner look and this is important when they
are in your refrigerator next to the keg.
We
have enjoyed our trusted kegerator for years
and would like to pass on the fun times a
party of friends with full glasses of draft
beer can have. Few folks with kegerators ever
regret owning “the perfect touch”
to a party, social event, or evening
for two.
And
everyone likes saving money, right?.....with
a kegerator you pour fresh beer for pennies
a glass. And to add the icing on the cake
you help protect the environment in a small
way. Keeping one more persons cardboard and
aluminum out of the land fills does help.
If you are looking for a complete kit with all the components you will need, try these guys out, MicoMatic.com.
$130 for a kit and fast shipping .
Kegerator Component List:
·-CO2 Gas Regulator
·-Brewery Approved Pressure Hose with Connectors
·-System D “American” Keg Coupler
·-Brewery Approved Beer Hose with Connectors
·-Beer Shank Assembly
·-Shank Door/Wall Spacer
·-Beer Faucet and knob
·-Step-by-step instructions
Click the link below and you'll find they ship fast and are cheap.
However,
you do not need to buy a kegerator kit from
them you can build your own with these
instructions. |
2.
CO2 Regulator. The regulator is the gauge
device that will
display the amount of CO2 pressure on the beer (P.S.I)
as recommended by the brewer. Really the only way
to figure out the "pounds per square inch"
setting is to ask the place that you buy your kegs
from. The P.S.I is typically not marked on the keg
when you buy it and this will leave you guessing
when you get home and this is NOT a process that
you want to guess on; click
here to find out why.
Tip:
You can save money here and buy only one regulator
to display the amount of pressure on the beer.
However, this will leave you without much certainly
to how much CO2 is left in the CO2 cylinder itself.
And take it from us, because it has happened to
us, throwing a party on a Saturday night and running
out of CO2 can be a real bummer. You'll have to
pull the keg out of the refrigerator, put an old
fashioned pump on it, wrap it in ice and drink,
drink, drink because it will be flat and warm
in the morning.
So,
we recommend buying two regulators, one to display
the pressure on the beer and one to display the
amount of CO2 left in the tank so you know when
you are getting low and need to refill.
3.
CO2 Line. The CO2 line will be the supply
line for the CO2 to the sankey coupler .
This line will need two clamps, one for the sankey
coupler end and one for the regulator end. Typically
this is 5/16".
4.Beer
Line. The Beer line is the supply line
for the shank to the sankey coupler. Don't
worry while both the CO2 line and Beer Line attach
to the sankey coupler when assembling the unit little
arrows in the sankey coupler casting will explain
which end goes in and which ends goes out, so pay
close attention and watch for the difference. Typically
this is a bit smaller than the CO2 line at 3/16".
Both kinds off hosing needs to be purchased at a
commercial kitchen supplier because of the sensitivity
of the hose coming in direct content with the consumable
beer. Explain your project to the kitchen supplier
and they will have exactly what you are looking
for.
Advice:
Sometime it will be tempting to buy as much hose
as you can because the hose is cheap; usually
15 cents a foot. However, if you are only going
from the inside of a refrigerator to the outside
keep the hose short and trimmed. That way the
beer has less area to sit before being dispensed.
This will ensure each drop out of that keg is
tasty. AND, the shorter hose will be easier to
clean.
5.The
Shank. The shank is the essential piece
that is set between the faucet on the outside of
the refrigerator door and the beer hose on the inside
of the refrigerator. Essentially this is the piece
that goes through the refrigerator door. Be careful
to keep this clean
too.
Advice:
Shanks require a 3/4" in hole to be drilled
through the door of the refrigerator. So when you
are at the hardware store be sure to pick up a
3/4" hole saw bit. Buy a cheap one, it won't
be that much work for it to get through the door
of the refrigerator. BE CAREUL! Be aware thatsome
refrigerators have cooling element that run through
the door, read the owners manual of your refrigerator
because a punctured cooling element means a worthless
refrigerator. And NEVER drill thorough the sides
of a refrigerator or the rear, you are bound to
hit a cooing element there too. You’ll also
need to pick up a 2 1/8' flange to cover up the
edges of the hole that you drilled and give that
finished look between the outer door and the faucet.
6.
The Coupler. This is the toughest decision
to make for some and the easiest to make for others.
The coupler is the piece that attaches to the top
of the keg and unfortunately the brewers haven't
defined one agreed upon size. There are 5 different
couplers (D , S, U, A and G). Most American popular
beers are D style as well as Labatt, Molson, Samuel
Adams and Pete's Wicked and typically you will find
kegerator kits default with a D style coupler. If
you have further questions on which your favorite
beer is email
us and we'll be glad to help you out.
Advice:
Buy the D coupler regardless of your tastes. You'll
need it at sometime when drinking most popular
beers then switch it out when you bring home a
keg of tasty foreign beer.
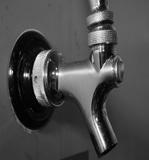 7.
The Faucet. The faucet is pretty obvious
and hooks to the shank and your handle. Typically
the faucets are polished chrome with a ball on the
inside that stops the beer when the valve is closed
by the handle.
7.
The Faucet. The faucet is pretty obvious
and hooks to the shank and your handle. Typically
the faucets are polished chrome with a ball on the
inside that stops the beer when the valve is closed
by the handle.
8.The
Handle. Again an obvious part of the unit,
however essential like all the others.
Advice:You
can easily customize your kegerator with your
own faucet. All you need to do is purchase a 3/8"
nut at the hardware store and that will fit on
top of the brass male end on top of the faucet
where you screw on the handle. So now you can
use old wooden carvings, wooden spindles, toys
or anything relatively light that you can drill
out at the bottom and glue the nut into. Then
after the nut is dry and secured to the bottom
of the new handle you can screw it onto the handle.
 9.
Drip Tray. As we move down the list, the
pieces to the kegerator kit become simpler. Obviously,
beers drip and you don't want it on the floor. Be
careful here to measure out enough room for a pitcher
to fit under the faucet without interruption.
9.
Drip Tray. As we move down the list, the
pieces to the kegerator kit become simpler. Obviously,
beers drip and you don't want it on the floor. Be
careful here to measure out enough room for a pitcher
to fit under the faucet without interruption.
Advice:
Save your money and buy a drip tray without a
drain. Usually you won't have that much trouble
pouring out the little beer that does collect
and running an unsightly hose in front of your
kegerator isn't that good of an idea.
10.
Washers. Buy one fiber washer to go between
the regulator and the CO2 tank. This washer is available
where you get your tank filled. Buy one neoprene
washer to go between the keg coupler and the beer
line. This will stop beer from leaking out of the
top of the coupler all over your refrigerator.
11.
Clamps. You'll need three clamps to hold
the hoses on to the regulator, coupler, and the
shank. Standard screw tight clamps will work here.
12.
3/4" Hole Saw. Like we mentioned before,
you'll need to saw a hole through the door for the
shank to fit.
Advice:
Save your money and buy a cheap one. Unless you're
going to be a plumber someday you probably won't
use this much...... unless you make a kegerator
for your friends.
Here
at KegBooty.com we specialize in quality, inexpensive,
kegerator kits to complete your kegerator. Click
here to see some of our specials.
Have a question? We'll help out if we can.
|
|
|